Zoom - Web Conferencing

This guide will walk you through downloading and installing Zoom, creating and setting up your account, and exploring essential features such as joining or scheduling meetings, screen sharing, cloud recordings, breakout rooms, and more.
Before downloading and logging into Zoom, the first step is to verify your account type. Instructors can request a fully licensed Zoom account for instructional purposes. A licensed account offers full access without restrictions, such as time limits or recording limits. It is strongly recommended that all instructors verify their accounts well in advance of semester start dates.
- To verify your account, open a web browser and go to https://uleth.zoom.us/
- Click Sign in and log in using your UofL email and password.
- Scroll down until you see Account, and underneath it should say License.

If it says Licence, you’re set, but if it says Basic, please contact Information Technology Services help@uleth.ca to request a licence.
For Windows users: Click the Download Link and select the version that works with your computer
- Select the 64-bit version if you have a newer computer (Windows 10 and above).
- For older computers, select the 32-bit version.
For Macintosh users: Click the Download Link and select the version that applies to your computer.
- Select the Apple Silicon download for newer Macintosh computers (M1 chip and above).
- For older Macintosh computers, select the Intel download.
NOTE: The Zoom application download will typically be saved to your Downloads or Desktop folder. Locate and open the file and follow the steps to complete the installation.
For cellphone users:
- Open your application store, type Zoom and install Zoom Workspace
Sign in from the Zoom app:
- Locate and open the Zoom application (found in your Applications folder)
- Click Sign In
- Click SSO
- ((If prompted)) under "company name", type uleth, then click continue
- Sign in using your UofL email and password
- ((If prompted)) click Open zoom.us
- The Zoom application should open and sign you in
To test your camera and microphone, visit https://zoom.us/test and follow the on-screen instructions.
If you have an upcoming meeting and would like to test additional features like screen sharing, you can contact Kevin Orr at kevin.orr@uleth.ca to schedule a Zoom test meeting.
To ensure a smooth Zoom experience, try to keep your application up to date. This will allow you to access new features and benefit from bug fixes.
- Sign-in to Zoom (application)
- Top Main Menu (top left)
- Zoom Workplace
- Check for updates
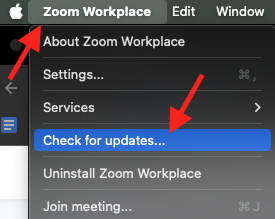
- Follow the prompts
- Ensure you have installed the Zoom application
- Refer to Application - Download and Install
- Sign in to Zoom
- Refer to Zoom App - Account Sign-In
- Check for Updates
- Refer to Check for Updates
- Click the Zoom link from your email
- You may receive a prompt to open zoom.us. This is normal
- Ensure you have installed the Zoom application
- Open your application store, type Zoom and install Zoom Workspace
- Click the Zoom link from your email/Calendar
The following outlines how to send a single, non-recurring Zoom link.
- Sign in from a web browser:
- To sign in to Zoom, go to https://uleth.zoom.us/
- Click Sign In
- Sign in using your UofL email and password
- Click Meetings (left)
- Click Personal Room (middle)
- Click Edit (bottom)
- Passcode:
- Place a checkbox next to Passcode and enter a password, then click Save
- NOTE: The passcode will be embedded and encrypted within the link, creating a single-click link that doesn’t require a separate passcode entry.
- Click the copy icon next to the invite link

- Draft an email and paste the copied link to send the invite.
The following outlines how to create/send a recurring Zoom meeting.
- Sign in from a web browser:
- To sign in to Zoom, go to https://uleth.zoom.us/
- Click Sign In
- Sign in using your UofL email and password
- Click Meetings (left)
- Upcoming (middle)
- + Schedule a Meeting (right)
- Set all the parameters (Topic, start date, duration, etc., and make sure you place a checkbox next to Recurring Meeting
- Set all the recurrence options.
Here is an example of a weekly Zoom session that lasts three hours every Monday and Wednesday and ends on December 4.
Image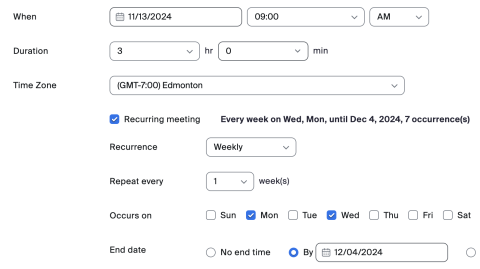
- When you are all done, click Save
- Click the invite link icon (it will copy the link)

- Draft an email and paste the invite link into the email
Here’s how to join your "personal room" after setting it up using the "Creating a Meeting - Personal Room" method.
- Open your Zoom application and sign in
- Refer to Zoom App - Account Sign-In
- Click Meetings (middle)
- At the bottom (left) you should see "PMI Personal Meeting ID" and a number.
Click the number and then click Start
Image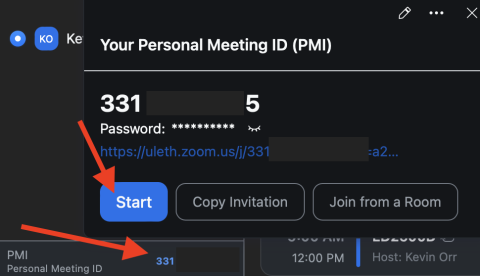
Here’s how to join your recurring meetings after setting it up using the "Creating a Recurring Meeting" method.
- Open your Zoom application and sign in
- Refer to Zoom App - Account Sign-In
- Click Meetings (middle)
- You should see a list of the recurring meetings that you created.
- Click one of your meetings, then click Start (blue)
- Image
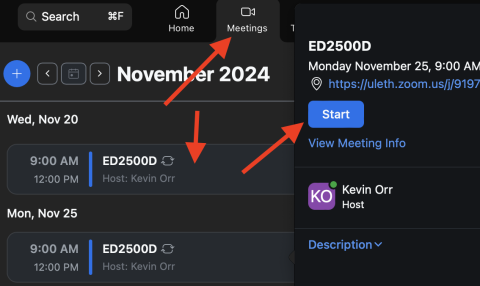
- NOTE: The Zoom ID for a recurring meeting will differ from your "personal room" ID.
The following outlines how to set up an automatic recording of your Zoom meetings.
- Sign in from a web browser:
- To sign in to Zoom, go to https://uleth.zoom.us/
- Click Sign In
- Sign in using your UofL email and password
- Click Meetings (top-left) then click Personal Room (middle)
- Click Edit (bottom)
- Next to options, click Show (blue)
Place a checkbox next to Automatically record meeting, then click the In the Cloud bullet
Image
- When you are done, click Save
The following outlines how to set up an automatic recording of your recurring Zoom meetings.
- Sign in from a web browser:
- To sign in to Zoom, go to https://uleth.zoom.us/
- Click Sign In
- Sign in using your UofL email and password
- Click Meetings (top-left) then click Upcoming (middle)
- Refer to "Creating a Meeting - Recurring Meeting" to create a new recurring series
If you've already created a scheduled series of meetings, roll over the first meeting with your mouse and click Edit, then select Edit Entire Series
Image
- Scroll down to the bottom, then next to Options, click Show (blue)
Place a checkbox next to Automatically record meeting, then click the In the Cloud bullet
Image
- When you are done, click Save
The following outlines how to create breakout rooms within the Zoom app.
- Open and sign in to the Zoom application
- Refer to Zoom App (Computer) - Account Sign-in
- Start a meeting
- Refer to Zoom App - Joining your Personal Room or Zoom App - Joining Your Recurring Meeting
- Click the Breakout Rooms icon (bottom-middle)
- Choose how many rooms you would like to create, then select Assign automatically, Assign Manually or Let participants choose room
When you are done, click Save
Image
- To open the breakout rooms, click Open all rooms
Assigning/Joining rooms:
To join a room manually, click Breakout Rooms, then move your cursor to the right of the room you wish to join, and click Join.
Image
- To assign a user to a room, move your cursor to the right of the room, select Assign and choose the user.
If assign automatically is chosen, users will be automatically split into the rooms evenly.
Broadcast:
- As the host, you can send a reminder or warning as a broadcast message. Click on Breakout Rooms, then select Broadcast and choose Broadcast Message. Type your message and click Send.
Closing Breakout Rooms:
- To bring everyone back to the main room, click Breakout Rooms, then Close all rooms.
The following outlines how to record a meeting and save it to your personal cloud space in Zoom.
- Open and sign in to the Zoom application
- Refer to Zoom App (Computer) - Account Sign-in
- Start a meeting
- Refer to Zoom App - Joining your Personal Room or Zoom App - Joining Your Recurring Meeting
Locate the Record (bottom middle), then select Record in the Cloud
Image
The following outlines how to edit a recorded meeting from the cloud.
- Sign in from a web browser:
- To sign in to Zoom, go to https://uleth.zoom.us/
- Click Sign In
- Sign in using your UofL email and password
- Click Recordings and Transcripts (left)
Click the recording you would like to edit
Image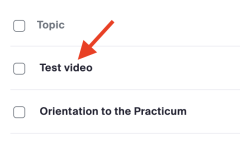
Click the video itself to open the editor
Image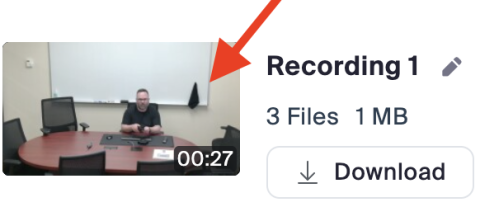
Click the scissor icon (bottom right)
Drag the sliders to cut out the areas you want to remove/keep (Anything in the blue is what you are keeping. Anything outside of the blue will be cut)
NOTE: We suggest moving the slides on the left side first.
Image
- Press the spacebar on your keyboard (or the play button on the left) to play the video and select the precise sections you want to keep.
NOTE: We recommend starting with the slider on the left. Move the slider and use the playback feature to position it precisely where you want. Then, click Trim. To enable the trim option again, refresh the page (it may take a minute to enable the trim option again). Next, adjust the slider on the right and use the playback to confirm the position. Click Trim again when finished.
The following outlines how to share a recorded meeting from the cloud.
- Sign in from a web browser:
- To sign in to Zoom, go to https://uleth.zoom.us/
- Click Sign In
- Sign in using your UofL email and password
- Click Recordings and Transcripts (left)
- Click Personal Room (middle)
Click the edit icon to the right of the video title
Image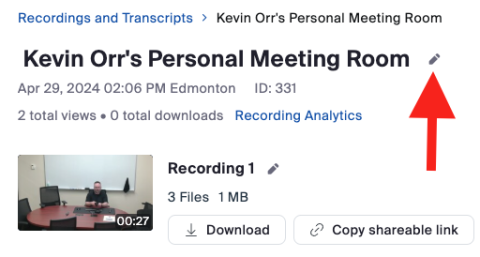
- Type a new title, then click Save (blue)
- Click the share icon to the far right of the video, then click Share Settings
- Set the share settings
- NOTE: If a password is set, the video share will include the password for viewers to enter.
- Click Save when you are done with the settings.
Click the copy icon
Image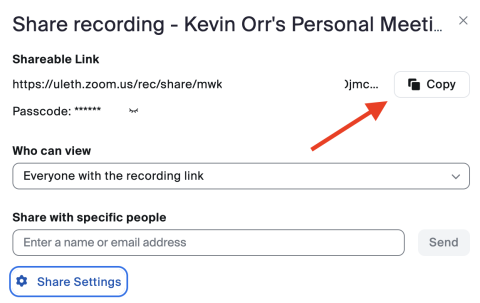
- Draft a new email and paste the copied Zoom link
The following outlines how to share a recorded meeting from the cloud.
- Sign in from a web browser:
- To sign in to Zoom, go to https://uleth.zoom.us/
- Click Sign In
- Sign in using your UofL email and password
- Click Recordings and Transcripts (left)
Place a checkbox next to the video(s) you would like to delete, then click Delete Selected (red)
Image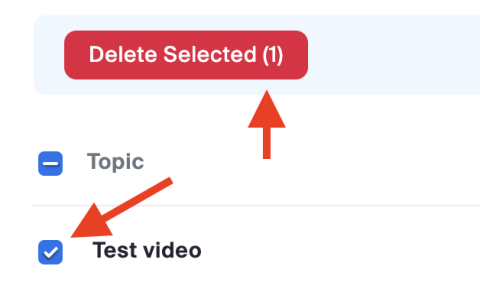
The following outlines how to assign someone as the host of your meeting:
Why assign someone as a host for your meeting? If you have to leave a scheduled meeting early, assigning a host allows that person to become the primary host, which gives them access to manage breakout rooms, recording, polls, and more.
- Sign in from a web browser:
- To sign in to Zoom, go to https://uleth.zoom.us/
- Click Sign In
- Sign in using your UofL email and password
- Click Profile (top-left) and scroll down till you see Host Key
Click the eye icon to reveal the host key
Image
- Copy the host key (right-click the key and select Copy) and send it to the person who you wish to host your meeting for you
The following outlines how to use a host key to claim the host role in a meeting.
- Sign in to Zoom via the Zoom app:
- Refer to Zoom App - Account Sign-In
- While in a meeting, move your cursor to reveal the options at the bottom of the window and select Participants
- A list of the participants will pop up
Click Claim Host (bottom of the window) and paste the host key
Image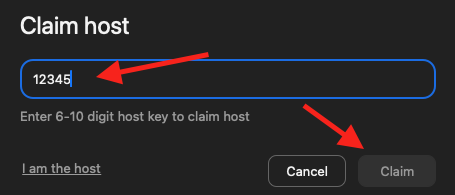
The following outlines how to assign an alternative host to your meeting.
Why assign an alternative host for your meeting? If you can't attend, an alternative host can take over, allowing them to manage your meeting in your absence. They can set up a recording, manage breakout rooms, share your presentation, etc.
- Sign in from a web browser:
- To sign in to Zoom, go to https://uleth.zoom.us/
- Click Sign In
- Sign in using your UofL email and password
- Click Meetings (top-left) then click Personal Room (middle)
- Click Edit (bottom)
- Next to options, click Show (blue)
In the Alternative Host text box, enter the email address of the person you wish to use as an alternative host
- If their name pops up, click their name
- When you are done, click Save
